
Samuel Clay is a grad student in the schools of design and of engineering at Harvard. He founded NewsBlur, a personal RSS news reader, and Turn Touch, beautiful control for the smart home.
Talk to him @samuelclay.
Samuel Clay is a grad student in the schools of design and of engineering at Harvard. He founded NewsBlur, a personal RSS news reader, and Turn Touch, beautiful control for the smart home.
Talk to him @samuelclay.
Dear Mom and Pop,
This was going to be an awkward year for us from the start. Thanksgiving is normally a time when we, two dozen immigrant Jews and first-generation Americans, come together to eat a turkey stuffed with oranges, served with a side of smoked fish and a dozen competing salads.
Before the election, I thought the greatest thing that would divide our dinner table would be my recently adopted vegetarianism. But us Jews are all about dietary restrictions. Eight breadless days of weight loss every year during Passover. Fasting from food and water every year for the day of atonement. Two sets of plates for Shabbat and for everyday. I was certain that refusing meat wouldn’t stop me from feeling embraced and loved at the table.

But then last week you voted for Trump. Jewish refugees from the Ukraine now living in Ohio voted for Trump. You have told me several times that Obama is the worst president in our lifetime. And so you voted for Trump.
Continue reading Open letter to my family in Ohio: I am still coming home for Thanksgiving this year (961 words)...This was my second year attending Burning Man. Many use Burning Man as a week to detach from their workweek and experience a new life of intense leisure. Not me, I come to Burning Man to build.
Pulse & Bloom is a 2014 honorarium installation. The core team of 6 people — Saba Ghole, Shilo Shiv Suleman, Rohan Dixit, Heather Stewart, Luke Iseman, and myself — built 20 interactive lotus flowers made out of steel and rowlux. Each lotus flower ranges from 8 to 18 feet tall, each of which lights up with your pulse. You and another person can put your hands on a couple of Hamsa hands at the base of the lotus flower and your respective heartbeats will light up the flower.
We’ve gotten some great press coverage at the BBC, The Guardian, The Atlantic’s Big Picture twice, CBS News, NBC News, and MSNBC.
As usual, the complete source code for Pulse & Bloom is on GitHub.
Here are a couple videos of all twenty lotus flowers in full working order.

Each lotus flower is blue until a person or two sits down at its base and places their hand on the pulse sensor. You can see the Hamsa hand and its embedded pulse sensor in this shot of my girlfriend Brittany and me working on keeping the electronics going.
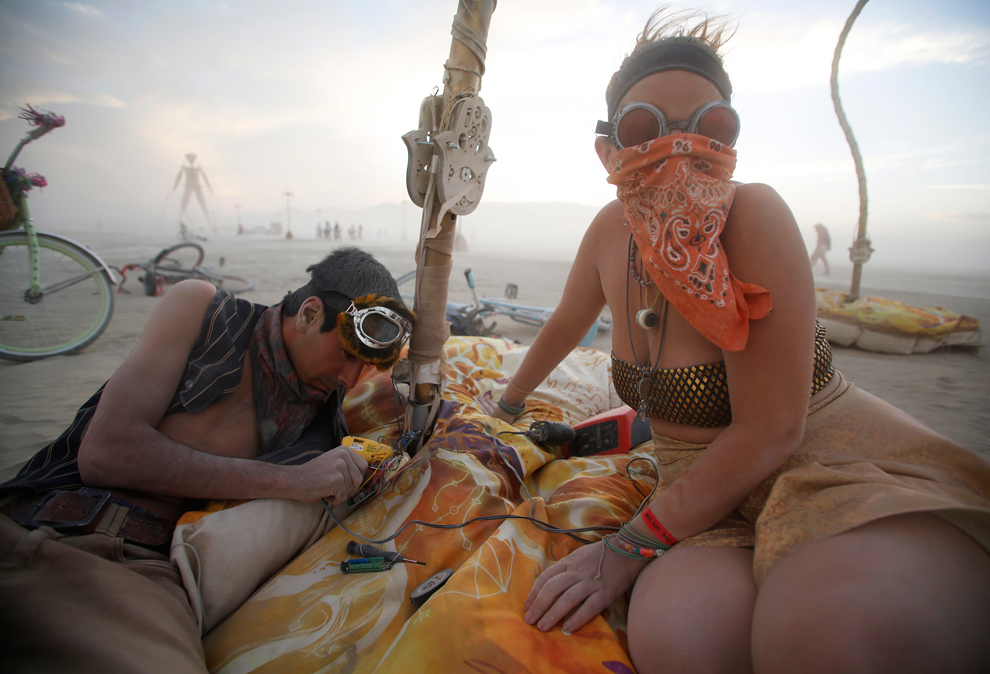
When a pulse is read, the lotus flower shoots the heartbeat up the stem and into the petals, where it blooms in a brilliant display of amber. When two people’s hands are being measured, both of their heartbeats are shown as two distinct colors.
Continue reading Building Pulse & Bloom - an interactive biofeedback installation at Burning Man 2014 (3405 words)...

|

|

|

|
For New Year’s Eve 2014, my girlfriend and I went to a dance party where wearable electronics were not only encouraged but also on display from a variety of hobbyists. I decided to use this as an opportunity to combine two of my favorite hobbies: sewing and electronics.
It is my goal to encourage more people to weave wearable electronics into their own clothing. It’s the future and we might as well look the part. Plus it’s easy to get started and to modify existing code.
The full source code for this dress is available on GitHub.
|
|

|
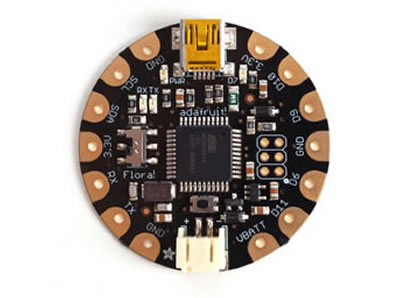
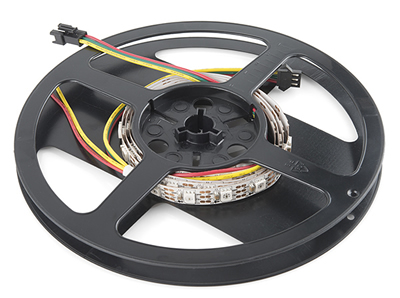
I attached six addressable LED strands from Sparkfun ($20 each) to the lining of Brittany’s dress, and then used a Flora module from Adafruit ($25) to control them. I then used a 3 x AAA battery holder from Adafruit ($2).
I used Adafruit’s NeoPixel library to control the LEDs. There were 60 LEDs per 1 meter-long strand. We only needed 40 of the LEDs, but instead of cutting them off, we simply sewed the unused third underneath the strand and cut the software off at 40 LEDs. This way we can repurpose the LED strands when we decide to move them to a new dress.
In order to make the connections between the LED strands and the Flora module, I used 30 AWG wire, which is an extremely thin and light wire. The gauge is 0.01” and is as fine as thread. This allowed me to sew the wire into the fabric. I could have used conductive thread, but this wire wrap has a sheath that prevents it from shorting other wires when they touch. It’s also extremely light-weight, so having 18 wires (3 wires per LED strand: power, ground, data) looping around the dress wasn’t an issue.
I also want to mention that the code below is hard-coded for six stands. There is a fine line between a hack and a project, and for this, due to my limited time budget, was closer to hack than reusable project. You can easily abstract the code below to account for more or fewer strands, but I was able to ship before midnight on NYE, so I’m considering it a success.
void setup() {
  // To ensure that the first random color in `loop` is never the same
  randomSeed(analogRead(0));

  led_a.begin();
  led_b.begin();
  led_c.begin();
  led_d.begin();
  led_e.begin();
  led_f.begin();

  clearLEDs(true);
}

void loop() {
  for (int i=0; i<2; i++) {
    hulahoop(randomColor(), random(20,60));
  }

  sparkle(randomColor(), random(30,70));

  raindrops(randomColor(), random(20,60));

  spiral(randomColor(), random(15,30));
}
Above we have the code for setup and loop, the two main Arduino routines. Notice that I am repeating the hula hoop routine, since it’s pretty quick and looks good on repeat.
I also want to note that every single routine gets its own random color and random delay. This bit of randomness is something I weave into all of my wearable electronics, since it goes just a bit further than off-the-shelf components and shows that there was some intelligence behind the routine.
By giving a random delay to each routine I am actually changing the speed of the routine. Sometimes the raindrops would fall quickly, sometimes the hula hoop would have a slow fall and rise. It’s all part of making mesmerizing patterns.
Continue reading Adventures in Wearable Electronics - Making a Light-up Dress (4949 words)...Every hardware hacker has a start, and this one is mine. My girlfriend bought me a Raspberry Pi for my birthday, and so I became determined to build something with it for her birthday two months later.

As you can see above, I built a photo frame that has a few interesting parts. For one, the software which runs the photo frame, which I explore below, keeps the photos fresh from Instagram and Flickr. It then displays a random photo for a configurable six seconds. Secondly, there is a motion detector, built using a PIR sensor, which only turns the monitor on when somebody walks by.
This photo frame is easy to build, but it does take a bit of know-how. Mainly, you should feel comfortable soldering wires and mounting the screen and Raspberry Pi to a board or other object. The hard part for me was figuring out how to turn the monitor on and off through the command line.
Everything else is gravy, from configuring wifi and autoboot/auto-login on the device to attaching and setting up the motion detecting PIR sensor. You can also use the eLinux guide to Raspberry Pi and its handy RPi Hardware Basic Setup wiki.
I chose to use a Raspberry Pi for its simple wifi integration so that photos could be automatically updated. I didn’t want to have to load photos on to an SD card which could then be read by an Arduino.
Connecting the monitor was also trivial on a Raspberry Pi, where an Arduino, Maple, or Beagle Bone would require sourcing a connection between the monitor’s composite input and an output from the device.

Make note of the fact that you actually don’t see any of my connections on the top of the board (pictured below). In the below photo, where the Raspberry Pi is flipped vertically to show off the electrical connections, the monitor’s composite cable and the motion detecting PIR sensor’s red wires are soldered underneath.

This way the photo frame looks cleaner. If I had connected the monitor using the yellow composite cable, it would have to be with a male-to-male composite adapter, since both the Raspberry Pi and the monitor have a male RCA connection. This would jut out about 2 inches below the device, resulting in a messy look for the frame.

Note that if you do not plan to solder the composite cable’s two wires, you will need the ugly male-to-male adapter, sold for $1.50 on Adafruit.
There are a number of different sized LCD monitors:
 |
 |
 |
1.5" LCD, $40 |
2" LCD, $40 |
2.5" LCD, $45 |
 |
 |
 |
4.3" LCD, $50 |
7" LCD, $75 |
10" LCD, $150 |
We’ve all done it. Our code base has one huge monolithic file, packed full of JavaScript spaghetti. It’s unwieldy, hard-to-debug, and has little to no separation of concerns. It is a nightmare to bring new engineers up to speed.
This blog post is about decomposing NewsBlur’s single-file 8,500 line JavaScript application into its component parts: 8 models, 12 views, 3 routers, 3 collections. This post explores patterns, techniques, and common pitfalls in migrating from vanilla JavaScript to Backbone.js. It covers moving routers, models, and views, and the process used to migrate a living app.
NewsBlur is a free RSS feed reader and is open-source. The benefit of being open-source is that you can see all of the changes I made in this migration by looking through the commit history.
As a bit of background, I worked on Backbone.js in its infancy, when Jeremy Ashkenas and I worked on DocumentCloud’s many open-source projects.
This post was written concurrently with a presentation. Depending on your style, you can either read on or flip through this deck. Both have the same content, but this post expands on every concept in the presentation.
There’s no need to go through the presentation. Just read on for the whole kaboodle.
There are only two libraries you need to be intimately familiar with in order to make the most of your Backbone transition: Underscore.js and Backbone.js. That means not only being comfortable with reading the source code of these two libraries, but also knowing all of the methods exposed so you can reach into your grab-bag of tricks and pull out the appropriate function.
Underscore.js is another DocumentCloud library that makes your code more readable and compact by providing useful functions that massage, filter, and jumble data.
One popular use of Underscore is creating short pipelines that take a large collection of models and filters it based on conditions. That much is easy. But there are other uses that are beneficial to know.
You should be comfortable with all enumerable methods. Think about all of your model collections as reduce-able, filterable, and selectable.
Here are two examples of Underscore.js at work:
// Get ids of all active feeds
_.pluck(this.feeds.select(function(feed) {
    return feed.get('active');
}), 'id');
// Returns: [42, 36, 72, ...]

// Count fetched/unfetched feeds
var counts = this.feeds.reduce(function(counts, feed) {
    if (feed.get('active')) {
        if (!feed.get('not_yet_fetched') || feed.get('has_exception')) {
            counts['fetched_feeds'] += 1;
        } else {
            counts['unfetched_feeds'] += 1;
        }
    }
    return counts;
}, {
    'unfetched_feeds': 0,
    'fetched_feeds': 0
});
// Returns: {'unfetched_feeds': 3, 'fetched_feeds': 42}The star of the show is Backbone.js. The entire backbone.js file is fewer than 1,500 lines long, and that’s with 228/1478 lines of whitespace (15%) and 389/1478 lines of comments (26%).
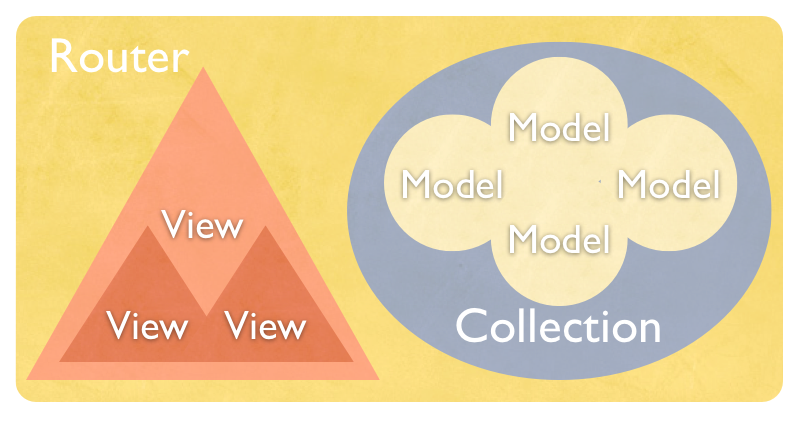
This is a basic example of the layout of the four main classes: models, views, collections, and routers. A fifth meta-class called Events is mixed in to each of these classes.
The first step is no easy task. Take your existing design and visually decompose it into its component views. Each view will be represented by either a single model or a combination of models. In fact, you can even have a view not be backed by a model at all.
Take the NewsBlur UI for example. It’s a standard three-pane view, with feeds, stories, and story detail:

Notice that there are multiple views inside other views. Some views are meant to be simple wrappers around other, more functional views.
Continue reading Backbonification: migrating a large JavaScript project from DOM spaghetti to Backbone.js (6323 words)...